Discount Kitchen Cabinets

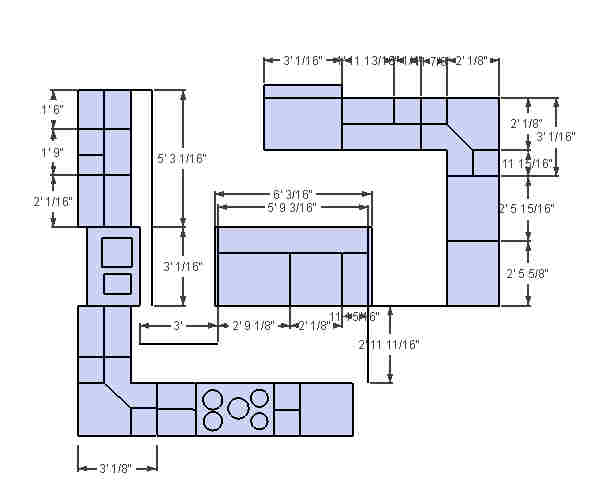
During the design phase of the houseplans, the kitchen is always my domain. I pull out my grid paper, mechanical pencils, and, using standard cabinet sizes, draw out my plan. This takes many iterations and, even now, is subject to change.

I’m very flexible about particular cabinet sizes, depending on what I can buy for a very good price. As many people will do when beginning a project like this, I took my initial kitchen dimensions and started with booklets picked up for free from Home Depot. I think people have the idea that buying cabinets from Home Depot will be less expensive than buying them from a custom cabinet installer. I have to say that I am very skeptical that this is a good assumption, after my research. Looking at the cost of cabinets available from the “Ready to Assemble” (RTA) places indicates that there is a generous profit margin between materials cost and delivered, assembled cabinet prices.

Once I had my initial plan put together, I then called the Home Depot cabinet help line and got an actual quote for the cost of the cabinets. In my discussions with the very helpful lady on their cabinet design helpline, I learned that Kraftmaid (which I assumed was a less expensive line) was one of the most expensive… right up there with their Thomasville line. To my surprise, she informed me that the Martha Stewart line was one of the more affordable lines. I also learned that the Hampton Bay cabinets that are offered on their site, are not part of their design services (if you order those, you are on your own!).

Oh, my gosh! They were so very expensive compared to what I thought was a reasonable price. After choosing one of the least expensive designs on the Martha Stewart line, I submitted my plans by email to the lady at the helpline. It took nearly 2 weeks to get a quote back. The quotation (for kitchen cabinets alone — not any bath or laundry cabinetry) was $16,242, not including sales tax or shipping.

I quickly became very motivated to seek out other sources. I discovered something called RTA cabinets (ready-to-assemble). There are many websites that offer discounted cabinets in this form. The main difference it that, as the name implies, you have to assemble the cabinets from the components after they are delivered to you. You can still choose the type of materials, hinges, panels, drawer style, etc. that you would expect from any other cabinet source. Other than the fact that you had to do your own assembly, however, I cannot see much difference between this and the cabinets sold by Home Depot. For the additional work involved in assembling the cabinets yourself, you can save a really huge amount. Not only will many of the sites offer you free shipping for larger orders, but you pay no sales tax because it was purchased out of state.

Taking it one step further, if you are willing to choose cabinets from the selection of cabinets that are on clearance, you can save even more.

One of my favorite sites (so far) is cabinetgiant.com. For example, at their site, if you choose a “closeout” cabinet design, you’ll save over 50% off most of the cabinets compared to their regular price (which is already much less than Home Depot’s comparable assembled products). Choosing a style called Brindleton Maple, which is not on closeout, using my kitchen plan with upper and lower cabinets, crown molding, and all the finishing materials, my estimated total came to only $6,910.

courtesy of CabinetGiant.com

Using closeout cabinets in their Antique White style for Bathrooms and Laundry Room cabinets, the total came to only $2,112. Now, granted, I had to modify my design slightly when certain sizes were not available in the closeout pattern. But for less than half the price at Home Depot, I’d say the extra time is well worth it.

We are not yet to the point where I can push the button and order these cabinets, and the current closeout stock will most likely be depleted by the time we are ready for cabinet ordering. However, this exercise in estimating the expected cost and exploring the possibilities will serve us well when the time comes.

So, although I realize this isn’t for everyone… if you are pretty handy with assembling things using simple tools, and if you are building a homestead, or even just planning to remodel a kitchen or bath, consider ordering ready-to-assemble cabinets and save yourself some big bucks.

Postscript: After Patty’s suggestion, I got started learning SketchUp. I still have a long way to go, but here is a first draft at a new kitchen plan (plan view):

Ah... much better.

Google’s SketchUp is very nice, free to use and offers some nice tutorials. If you are interested in downloading it, you can find it here:

Google SketchUp

Pecan Trees for the Homestead

photo courtesy of Dohmann Pecan Farms, Alvin, TX
Pecan trees are a part of our plan for the homestead. New Mexico is the 3rd largest producer of pecans (after Georgia and Texas), so they grow quite well in the region. We plan to plant several of the trees on the 5 acres, and to eventually produce pecans for our own use and for sale or trade. On a good year, a mature (15 year) pecan tree can produce 50 pounds of nuts per tree. Older trees can produce 100-200 pounds of nuts per year if well-watered and fertilized.

Pecan trees need a good deal of water, so some form of irrigation is a must in dry southern New Mexico. Our plan is to build a watering system using water from our well. We’ve designed and installed our own watering systems in several places, so it shouldn’t be a problem. However, pecan trees do better with an occasional flooding than with frequent sprinkling. They need a deep watering to produce well. Apparently, water is very critical during the late-summer and autumn months for production in the next year.

NMSU has a very helpful publication with information about planting and care of pecan trees in New Mexico. From their publication I learned this:

Plant at least two varieties to ensure pollination. Varieties suggested for planting in New Mexico include ‘Western Schley’, ‘Cheyenne’, ‘Ideal’ (‘Bradley’) and ‘Wichita’. The last two varieties are recommended as good pollinators.

A family friend still sells mature trees, of which we hope to buy at least two. Perhaps we’ll plant 2-3 more bare root trees from nursery stock to add to the orchard at a lower cost.

NMSU has another very helpful publication about the transplantation of mature trees. From that publication, I learned:

Mature pecan trees can be transplanted successfully at
any time of year in New Mexico. However, winter-transplanted
trees certainly experience far less water stress—
orchard water loss is minimal when the weather is cool;
the trees are dormant with minimal to no water needs;
and the root system has a chance to regenerate before
the heat of summer arrives.


Along with planting the trees, we have investigated the possibility of purchasing a cracking machine. Many homeowners have pecan trees in their yards and, like most people, find hand-shelling too tedious to do in large quantity. Our thought is that we could potentially barter cracking services for a portion of the harvest, which could be bartered for other things or sold.

There is a huge range of pecan processing equipment out there, but most of it seems to cater to large commercial processing operations. I found a couple of different crackers that seem to be a bit more attractive in terms of size and cost to a small homestead project. It looks like the approximate cost of the cracker would be about $3000. More investigation will certainly be done before any purchase is made.

Many cultivars bear in large quantity only every other year, so having several trees will increase our chances of a decent crop every year. With a bit of care, including pruning, watering and soil amendment, when needed, these trees will produce nuts, provide shade and produce leaf mulch long after our lives are done.

Living in an RV?

Home, sweet home...
Call it counter-cultural. Call it crazy. We have decided to take up housekeeping in an RV while we build our home. We do have a history of RV-living. Since we lived in the New Orleans area when Hurricane Katrina hit, we found ourselves living in a trailer for several months. We have done it before and know how it is.

Why do it?

In 2005, when Katrina hit the Gulf coast, we had no idea initially just how long it would be until we could go home. Only a couple of days after Katrina passed through New Orleans, we could see that it would be awhile before things returned to normal. We had several motivations that made the purchase of an RV seem a logical choice:

1. We had two kids and a large dog and were completely sick of hotel living. At least at a campground, we would have plenty of outside space and room for the kids and dog to run.

2. With the huge number of evacuees in the area, short-term apartments were in short supply.

3. We had no idea how long we would be evacuated, so were reluctant to sign a long-term lease.

4. If we were able to return home, but had no power, water, or sewer service, a trailer seemed like a very self-contained solution to use while working on home repairs.

5. Since my husband had to remain in the city where the evacuated military aircraft (from the New Orleans area) were positioned, even if allowed back home, he would have to stay with the aircraft, so the idea of staying together as a family unit was more appealing.

6. The idea of family camping trips in the future sounded like fun.

As it happened, we ended up living a total of 4 1/2 months in that RV… We learned a great deal from it and look back on it as a happy time. Since we had a overall good experience that time, we decided it would be a good thing to consider again during our construction… with a few changes.

We lived on-base at a very safe campground during our evacuation. There was a central bath house and a coin-operated washer and dryer at the campground. The boys had many a pleasant evening with a campfire and marshmallows at the campground. We became quite adept at preparing meals in our little trailer and learned many of the tricks of RV living. The boys continued right on with school at the little dining table.

Two things would have made such a huge difference in the standard of living. Better bath facilities and our own washer and dryer. It doesn’t seem like those two things would be so crucial. After all, we did have in our trailer a lovely shower/bath/toilet combo and separate bathroom sink. The laundry facilities were only a short walk away. I think I am just a bit spoiled to whine, but there it is.

We looked at our options for the build of our own retirement home. We could have chosen to rent a small house in town or even accepted the kind offer my parents made for us to stay with them. In the end, we decided to modify the design of the workshop to accommodate our needs and make things a bit more comfortable so that we could live on-site.

At first, we thought of actually building a living quarters at one end of the workshop and keeping it as a guest quarters later on, but couldn’t really justify the added cost when we looked at how little we expected to actually need guest quarters after the home was finished. We came upon the idea to just put in a finished bathroom with shower, sink and toilet and equip the workshop with a washer/dryer hookup. With those two things and our 5th wheel RV, we’d have all the comforts of home.

Cost-wise, it works out very well. We figure the extra cost of adding a bathroom to be fairly minimal and a useful bonus to our lives after the construction was complete. It will allow us to eliminate the cost of a rental house and rented storage units during the build time and also to protect our materials by living there.

It will be another adventure (but even better… this time we’ll have better plumbing).

Shoestring budget

How do we get to the place where we spend every bit of income we earn (and, in some cases, more than we earn)? While we were re-evaluating our lifestyle, I was reminded of the contrast with our finances in the beginning. In the early days of marriage, when we were living on 2LT pay, and trying to make up for a few bad decisions, we lived on an amazingly small amount of monthly income.

Let’s just put it into perspective: When we were starting out, my husband’s gross monthly income was $1088.80, plus $280.70 housing allowance. After taxation, I’m thinking we ended up with around $1100/month. From that, we paid $350/month rent, utilities, $250/month car payment (yes, my husband did not ascribe to my views on paying cash for cars yet), $75/month car insurance, food, and $90/month for furniture (my sweet husband picked out furniture to surprise me — you can guess how pleased I was).

From the above figures, you can see that we had $765/month already accounted for in fixed costs before utilities, food, gasoline, etc. It didn’t take me long to figure out that we were going to run out of cash waaay before we ran out of month.

So… I made all our food from scratch, watched the sales and did pretty well on our food budget. I had a bicycle that I used for transportation in the near area. No shopping trips for me, no eating out.

It still wasn’t working.

My idea was that I should find work. I immediately tried to find office work in the area, but had no luck. The local businesses had no interest in hiring a transient such as myself and had no pity for me since my husband was employed. My idea of finding work as a waitress was nixed by my husband (who didn’t think it was a fitting occupation for an “officer’s wife”, haha).

Upon looking at our monthly bills as our savings dwindled, I settled upon the utility bill as something we could reduce. I found the electric bill to be much higher than I recalled from college years. I began turning off the heat or A/C during the day and noticed a huge difference. This worked so well, I also turned off the hot water heater and only turned it on to heat up water before evening showers (trust me, it did save electricity).

Just the difference in utilities made all the difference for us. We were able to pay all our bills each month without dipping into our savings and still had about $40* left over for “fun money” each month.

Using this same train of thought may make the difference for folks trying to figure out how to get by on less or how to make it possible to save up a nest egg. It also illustrates how much an impact on monthly expenses reducing your utility costs can make. I won’t say there weren’t a few hot, humid days that I didn’t long for air-conditioning, but we made it!

*I was pretty gullible back in those days. My husband somehow convinced me that we should spend that $40 on an all-you-can-eat pizza buffet (total cost $12) and the rest on video games. He told me that he needed to play those games in order to develop sufficient hand/eye coordination that he wouldn’t die while learning to fly helicopters. If I hadn’t acquiesced, imagine the guilt I’d have felt if he had crashed.

Background

We’re moving home

In 2012, we’ll have been married 30 years. During that time, we have never lived anywhere longer than 4 1/2 years, and several times we moved from temporary to permanent housing within a very short period of time. Yes… we are making our 19th move of ourselves and belongings when my husband retires next year.

This time, we are moving back home. Along with our two boys, dog, two leopard geckos, and accumulated paraphernalia gathered as we, like gypsies, moved along to new ground periodically, we plan to make a new life for ourselves in my hometown.

The Decision

So… how did we decide to take this road? How did we choose where to put down our roots and spend the last years of raising our boys? In the end, it all came down to relationships and family. We didn’t choose our chosen locale based upon tax rates, local government, climate, inches/year of rainfall, employment or educational opportunities, cost of property, proximity to a major airport or good medical care…

The big draw for us was the grandparents. Yep, my parents have lived in the same town since 1961 and they aren’t going anywhere anytime soon. My in-laws also live only a couple of hours’ drive away. We want our boys to grow up around them. It’s as simple as that. Once that decision was made, the rest was easy.

It’s been only a couple of years ago that we made the decision for my husband to take the earliest possible retirement opportunity. Before that, we had envisioned continuing on for several more years working within the system and moving as required. We began to look at things a bit differently and focus more on preparing for our personal future more than on career. At that point, we began making a few changes to allow this early retirement to happen.

Making it Happen

Saving our nickels and dimes, eliminating all forms of debt, reducing our monthly costs ( in order to save more nickels and dimes)… this was a big factor in making this possible. We figured out that, in order for us to even have a chance of living on the monthly retirement income we’ll receive, we can not have any debt.

We calculated the amount of gross income we will have as retirement income, deducted our ‘off the top’ expenses, including healthcare coverage and taxes. Then, when we saw what was left over to live on, we were at first a bit dismayed. That number was about 25% of our current net income! Scary, right?

Well, we took a look at it and were wondering if we could actually live on it if we didn’t have any of the typical debt that most people have. Could we have a decent life on 25% of the amount we currently earn? We decided to try it out.

For the last year, each month, we decided to see if we could live on just what we would have at retirement, not exceeding that amount on any of the day to day living costs. We found out that, not only could we do it, we could actually live on less than the monthly income using a few simple techniques. I’ll put a post together on simple cost-saving methods that allowed us to live on less without sacrificing our quality of life…

Thanks for reading…